使用 AI 编码工具已经有一段时间了。写这篇文章时,我同时订阅了 Cursor 和 OpenAI Codex。它们都很出色,我的大部分主项目工作也主要依赖它们。
但在两周多前,我注意到了 Pi 这个开源终端编码代理。它的核心很小,功能不是默认全塞进去,而是通过扩展和包来按需添加。我很喜欢这个思路,于是决定搭起来试试,看看它适合放在什么位置。
现在我还在摸索最合适的使用边界,不过 Pi 已经在我的边项目和实验项目里占了一席之地。这篇文章里,我会分享自己是怎么安装它的、目前的配置是什么样子,以及到现在为止最真实的使用感受。
Pi 是什么
Pi 是由 Mario Zechner 创建的开源终端编码代理。它运行在终端里,默认给 AI 模型提供四个工具,也就是 read、write、edit 和 bash,用来处理你的代码库。
它没有内建的计划模式,没有子代理,没有 MCP,也没有权限弹窗。相反,这些能力都可以通过扩展、技能和包来补上。这样一来,核心会保持轻量,你也可以按自己的需要组装出刚好合适的配置。
Pi 支持很多 AI 提供商,比如 Anthropic、OpenAI、DeepSeek、Google Gemini、Groq、xAI、OpenRouter、Kimi 等等。你可以使用 API key,也可以直接登录已有订阅。
我怎么把 Pi 和其他工具配合使用
现在,不同类型的工作我会用不同的工具。
- OpenAI Codex 用来处理主项目里的复杂任务
- Cursor 用来处理这些主项目里更日常、更简单的编码工作
- Pi 用来做边项目、实验和一次性任务。我会把它和 DeepSeek、Kimi、Cursor 通过 pi-cursor-sdk 搭配使用,再按任务选择合适的模型
Pi 很适合边项目,因为它快、轻,而且可以放心用便宜一些的模型,不用一直消耗昂贵的订阅额度。
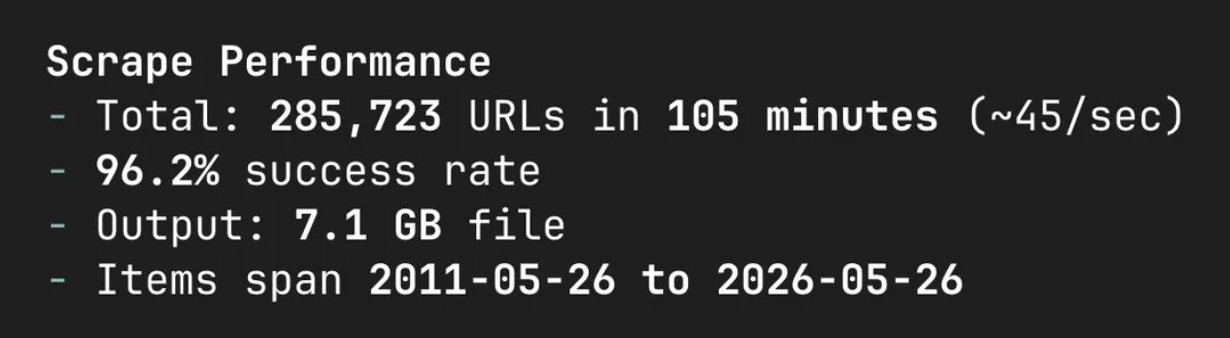
举个例子,我最近用 Pi 搭配 DeepSeek v4 Flash 模型,从一个网站抓取了 28.5 万个 URL。整个过程跑了大约 1.5 小时,通过官方 DeepSeek API 总共只花了 1 美元。我还用了 pi-codex-goal 扩展来跟踪这个长时间任务,整个过程没有出问题。你可以在 X 上查看更多。
安装 Pi
安装只需要一条命令。
curl -fsSL https://pi.dev/install.sh | sh
安装完成后,在终端里输入 pi 就能启动它。不过在这之前,你需要先配置 provider 和 API key。
把 DeepSeek 设为 provider
Pi 内建了 /login 命令,配置任何 provider 都很方便。我的操作是这样。
- 在终端输入
pi打开 Pi - 输入
/login,然后选择 Use an API key - 在 provider 列表里选择 DeepSeek
- 按提示输入我的 DeepSeek API key
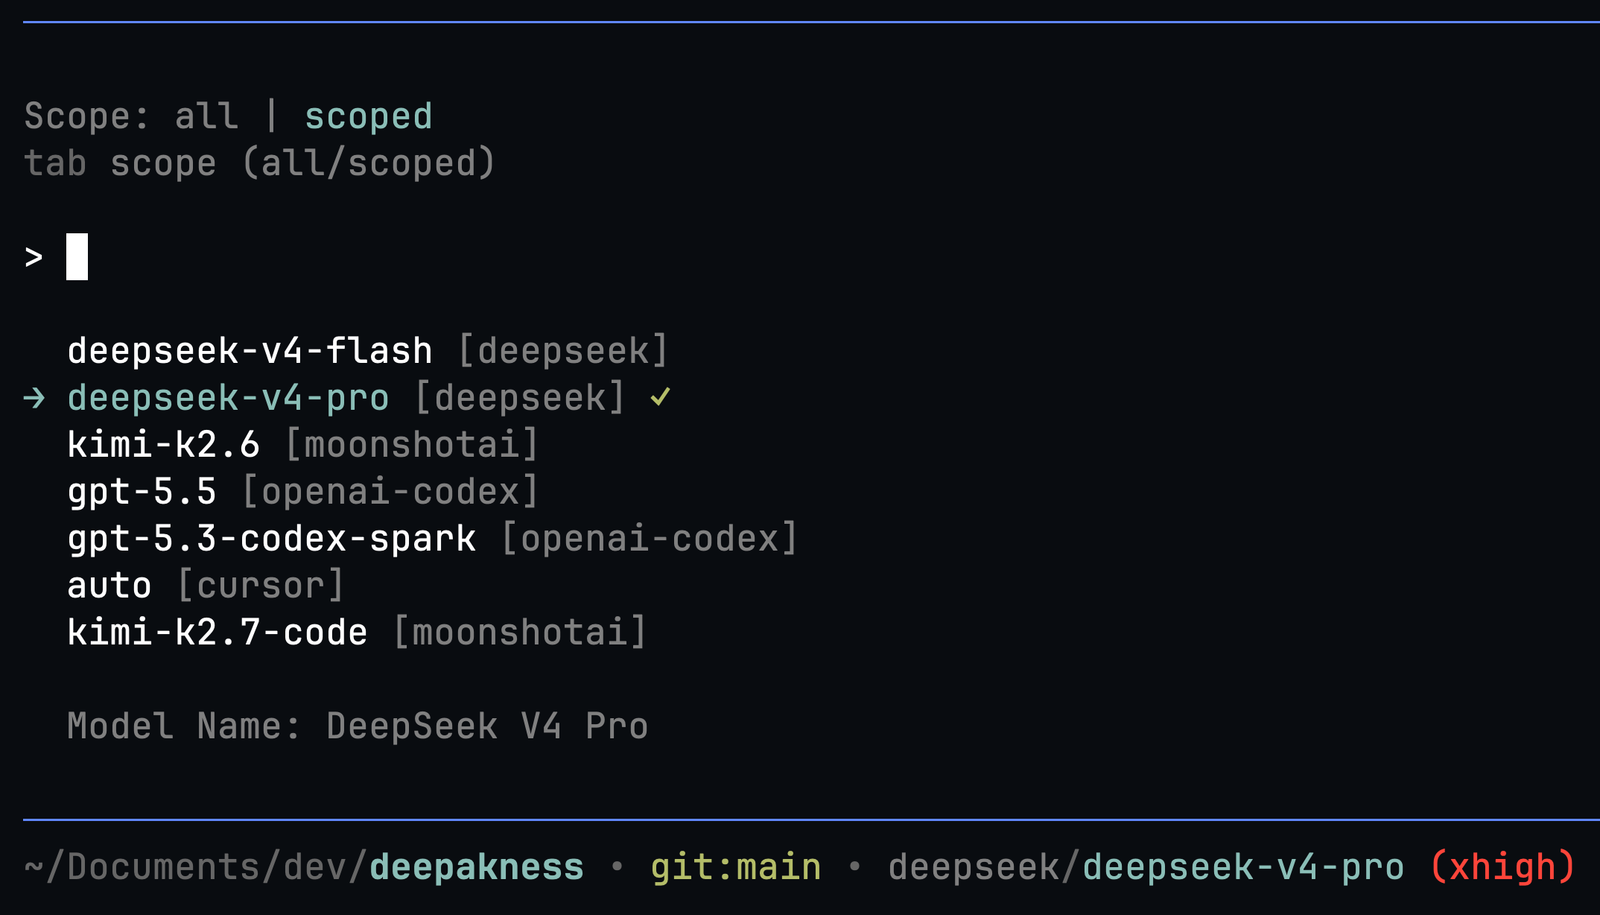
这样就可以了。Pi 会把 key 保存下来,后面就能直接使用。登录后,再用 /model 选择模型。我选的是 deepseek-v4-pro,思考级别设成 xhigh。
我默认用 xhigh,因为我希望模型在动手改东西之前先认真想透。像抓取 URL 这种更轻量的任务,我就会切到更快、也更便宜的 deepseek-v4-flash。
你可以用 Ctrl+L 打开模型选择器,用 Ctrl+P 在当前作用域里的模型之间轮换,用 Shift+Tab 切换思考级别。
我也会用 Kimi K2.7 Code 和其他模型,具体看任务类型。下面的模型组合里会继续说。
我的模型组合
我启用了好几个模型,会按任务随时切换。
| 模型 | 我的用途 |
|---|---|
| DeepSeek v4 Pro | 大多数边项目工作的默认模型,质量和成本比较平衡 |
| DeepSeek v4 Flash | 更轻、更重复的任务,比如抓取或批量文件操作,快而且便宜 |
| Kimi K2.6 / K2.7 Code | 想要第二意见,或者遇到限流时的替代选择 |
| Cursor (via pi-cursor-sdk) | 让我可以在 Pi 里直接使用现有的 Cursor 订阅,不需要额外 API key |
| OpenAI Codex (GPT-5.5) | 偶尔在某些任务更适合更强推理模型时使用 |
切换是瞬时完成的。Ctrl+L 会打开模型选择器,Ctrl+P 可以在当前作用域模型之间轮换。
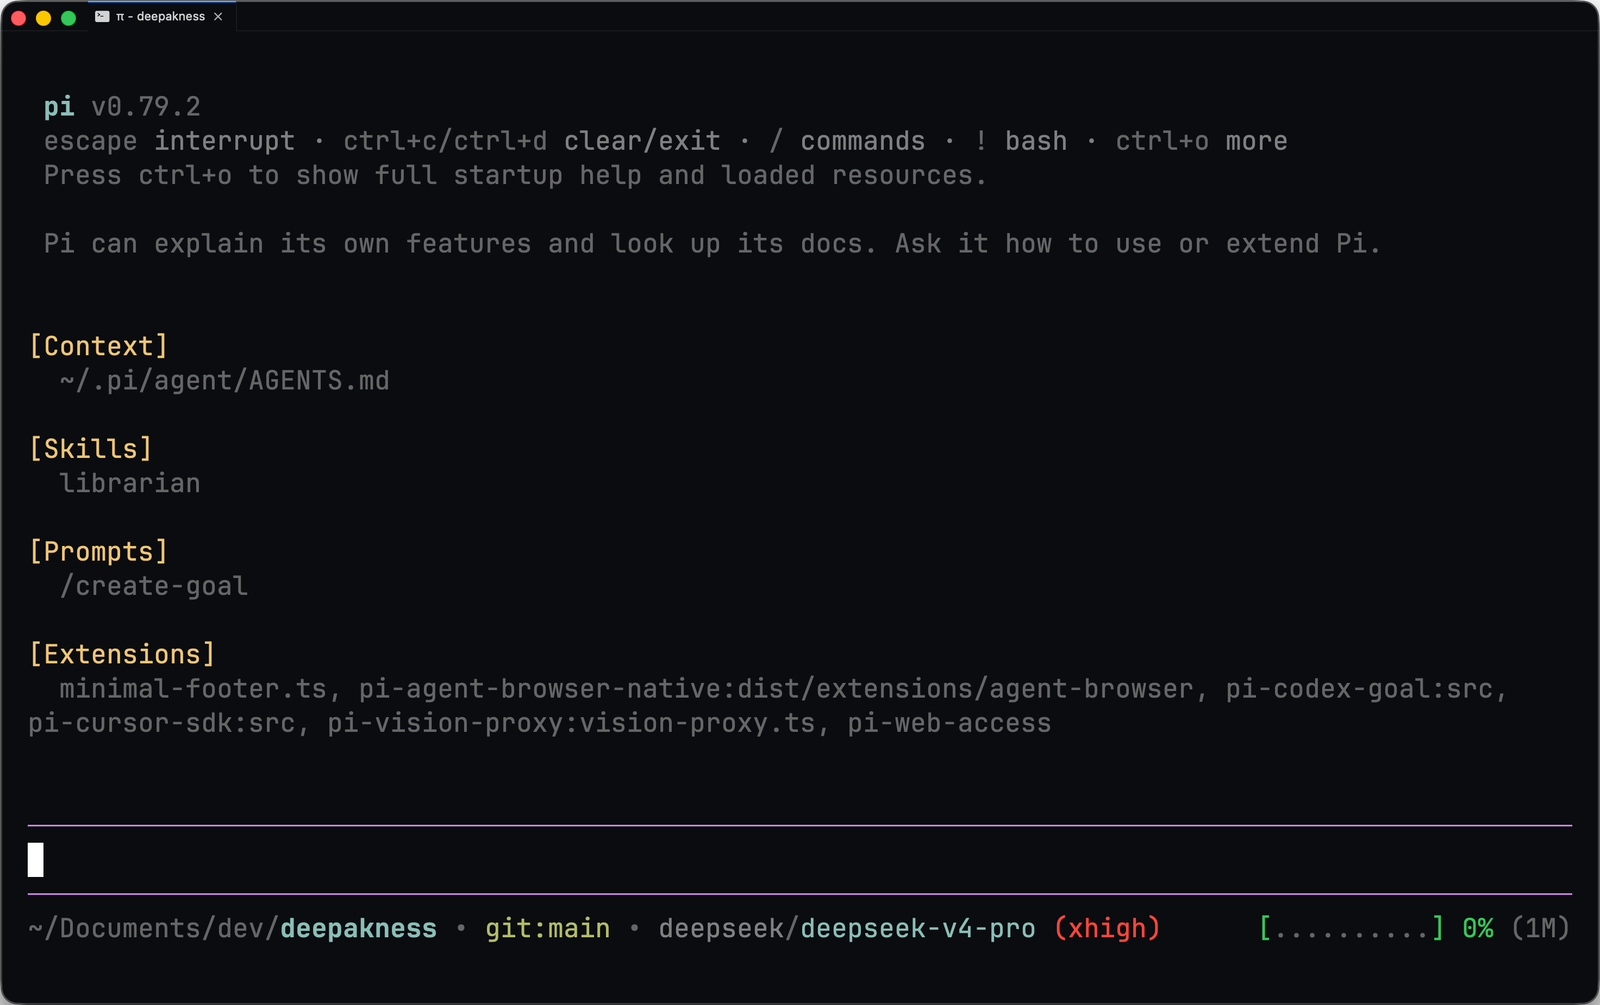
界面和我的自定义底栏
打开 Pi 之后,界面非常干净。底部是编辑器,中间是对话区,底栏会显示当前工作目录、git 分支、当前模型、思考级别,以及上下文窗口使用情况。
我很早就动手改了一个地方,就是底栏。默认底栏显示的信息比我需要的更多。所以我直接让 Pi 自己帮我做了一个极简自定义底栏。我把自己的需求描述给它,比如当前文件夹、带脏状态标记的 git 分支、模型名、思考级别、来自 pi-codex-goal 的当前目标,以及紧凑的上下文条,然后它就替我写好了对应的 TypeScript 扩展。

这个扩展放在 ~/.pi/agent/extensions/minimal-footer.ts,每次启动时 Pi 都会自动加载。我也把代码放到了一个 gist 里。你只要把它丢进 extensions 文件夹,再重启 Pi 就行。改动不大,但它让整个使用体验一下子更像自己的工具了。顺带也借这个过程了解了一点 Pi 扩展的工作方式。
我安装的包
Pi 的包可以是 npm 包,也可以是 git 包,里面会打包扩展、技能、提示词和主题。安装方式是 pi install。下面这些是我在用的。
1. pi-web-access
这个包让 Pi 能搜索网页、抓取页面内容、提取 YouTube 视频字幕,还能浏览 GitHub 仓库。你可以在 pi.dev/packages/pi-web-access 找到它。
pi install npm:pi-web-access
它开箱就能配合 Exa 搜索使用,不需要 API key。你也可以按需添加 Perplexity、Exa 或 Gemini 的 API key,获得更强的控制能力。我通过创建 ~/.pi/web-search.json 文件,把 Exa 配成了默认搜索 provider。
{
  "provider": "exa",
  "allowBrowserCookies": false,
  "summaryModel": "deepseek/deepseek-v4-flash",
  "workflow": "none",
  "curatorTimeoutSeconds": 20
}
有了这个包,Pi 就可以搜索网页、阅读文档、理解 YouTube 视频、克隆并探索 GitHub 仓库,整个过程都不用离开终端。
2. pi-codex-goal
这个包给 Pi 增加了目标跟踪能力。它由 Mitch Fultz 开发。它会给模型新增三个工具,也就是 get_goal、create_goal 和 update_goal,这样你就能创建长时间任务并跟踪进度。
pi install npm:pi-codex-goal
只要任务比较大、会跨越多轮提示词,我就会用它。我不用每次都重复上下文,只需要创建一次目标,Pi 就会持续记住后面还要做什么。它在那次 28.5 万 URL 抓取任务里尤其有用。哪怕会话拖得很长,目标机制依然能把任务稳稳带住。
3. pi-vision-proxy
DeepSeek 不能看图,也就是没有视觉能力。pi-vision-proxy 这个包就是为了解决这个问题。它会把图片代理给另一个具备视觉能力的模型。
pi install npm:pi-vision-proxy
我把 Kimi K2.6 配成了视觉模型。现在只要我把图片粘贴到 Pi 里,它就会带上一些上下文把图片发给 Kimi,然后再由 DeepSeek 根据 Kimi 的观察结果完成任务。对于偶尔扔给它的截图或者设计参考图,这种方式很好用。
在底层实现上,它会在可能的情况下把多张图片打包处理,还会通过感知哈希缓存重复截图,避免同一张图被重复分析。它也支持几种不同的 grounding 格式,方便在需要时做精确坐标定位。你可以在 X 上查看更多这套配置,那条 X 贴文里我也放了一个简短视频。
4. pi-agent-browser-native
这个包让 Pi 在终端里拥有一个真正的浏览器。它可以打开网页、截图和生成快照、点击链接、填写表单、跑 QA 检查,还能提取页面内容,整个过程都不用离开终端。
pi install npm:pi-agent-browser-native
我会把它和 pi-web-access 一起用。网页搜索负责找到信息,浏览器负责和实时页面交互、阅读那些依赖 JavaScript 的文档站点,以及做一些视觉检查。它还新增了 agent_browser_web_search 工具,比起先打开完整浏览器页面再搜索,会更快一些。
5. pi-cursor-sdk
如果你本来就在付费使用 Cursor,这个包可以让你直接在 Pi 里调用它,不用重复花钱。
pi install npm:pi-cursor-sdk
我自己有 Cursor 订阅,所以这个包非常自然就装上了。安装后,cursor/auto 会出现在模型选择器里,我可以像用其他 provider 一样使用它。这个包同样也是 Mitch Fultz 做的,他也是 pi-codex-goal 的作者。有了 Cursor 负责订阅制模型、DeepSeek 负责便宜的大量工作、Kimi 作为备选,我的覆盖面已经很好了,同时也不用再叠加更多 API 账单。关于通过这个 SDK 使用 Composer 2.5 模型,我也在原始笔记里写过更多内容。
用 AGENTS.md 和 APPEND_SYSTEM.md 写项目说明
Pi 有两种给模型下指令的方式。AGENTS.md 用来放项目相关上下文,APPEND_SYSTEM.md 用来放全局行为规则。
AGENTS.md 项目上下文
Pi 会在启动时加载 AGENTS.md 文件,并把它们注入 system prompt。它会从三个位置发现这些文件,全局位置是 ~/.pi/agent/AGENTS.md,然后会沿着父目录一路向上查找,最后再看当前目录,然后把找到的内容全部拼接在一起。
我自己的全局 AGENTS.md 很简短,只描述我平时常用的技术栈。
# Global Pi Instructions

- Projects commonly use Laravel (PHP/Inertia/React), Next.js
  (TypeScript/Tailwind), or Astro. Check the project-root AGENTS.md for
  stack-specific rules – if none exists, ask.
这里面 if none exists, ask 这一句很重要。比如我在一个纯 HTML/CSS/JS 文件夹里工作,或者在别的技术栈里工作时,代理不会强行往我身上套某个框架,它只会来问我。
我的大部分项目也都有各自的 AGENTS.md,里面会写框架相关规则,但这些文件我很少手写。它们通常是框架工具自动生成的,比如 Laravel Boost,内容里会带上这个项目准确的包版本和约定。
APPEND_SYSTEM.md 全局行为规则
AGENTS.md 是给项目上下文用的,但有些规则无论什么项目、什么技术栈都该生效,这时候就轮到 APPEND_SYSTEM.md 了。它放在 ~/.pi/agent/APPEND_SYSTEM.md,会被直接追加到 system prompt 里。这也意味着,这些规则的优先级高于 AGENTS.md 里的说明。
我在里面放的是这些内容。
- If the default provider doesn't have vision capabilities, use
  pi-vision-proxy for images.
- Read relevant local files first when the answer is available in the
  codebase. If not, research online via pi-web-access. Before making a
  big change based on online research findings, confirm with me first.
- Explain risky file edits and destructive commands before executing.
- Write simply. Avoid AI-slop language – no flowery adjectives,
  unnecessary adverbs, or overly formal phrasing.
- Use en dashes (–) not em dashes (—).
关于这些规则,还有几点说明。
- 视觉代理这条规则现在和 provider 无关了。我默认模型有时会是 Kimi,有时会是 DeepSeek,也可能是别的模型,所以不再把某个 provider 名字写死,而是直接检查当前模型有没有视觉能力。
- 第二条比我更早的版本写得更明确。它不只是说 别去搜索你已经知道的东西,而是明确要求代理先读本地文件,只有在需要时才上网搜索,并且如果要根据在线研究结果做较大的改动,先和我确认。
- en dash 这条只是一个简单的机械偏好,用来让所有会话里的文字风格保持一致。
我常用的快捷键和命令
Pi 有很多快捷键。下面这些是我经常用的。
| 按键 | 作用 |
|---|---|
Ctrl+L |
打开模型选择器 |
Ctrl+P |
在当前作用域模型之间轮换 |
Shift+Tab |
切换思考级别 |
Ctrl+C 连按两次 |
退出 Pi |
Escape |
取消或中止当前操作 |
Enter |
作为 steering message 发送,会打断当前工作 |
Alt+Enter |
作为 follow-up message 发送,会在当前工作结束后送达 |
我花了一点时间才适应 Enter 和 Alt+Enter 之间的区别。如果我想让 Pi 在工作做到一半时改变方向,我就按 Enter。如果我只是想补充一条备注,等它做完再处理,我就用 Alt+Enter。
下面这些命令我也常用,通常是在编辑器里输入 / 来触发。
/model不用记快捷键也能切模型/settings调整思考级别、主题和其他设置/resume继续之前的会话/new开启一个新会话/tree查看完整会话历史,并跳转到任意节点/compact总结旧消息,释放上下文空间/session查看当前会话信息,比如 token 和成本
/tree 这个命令尤其好用。你可以像看树一样浏览完整对话历史,跳到任意分支,再从那里继续往下做。想尝试另一条思路,又不想把之前的内容丢掉时,它特别方便。我最初是看到 Dillon Mulroy 分享的这个 Pi 会话之后,对这个功能产生了强烈兴趣。后来我也把自己从那个会话里学到的内容都整理进了原始笔记。
使用 Pi 过程中学到的几件事
长会话会把上下文窗口塞满。Pi 自带自动压缩功能,在空间快不够时会总结较早的消息。你也可以手动用 /compact。另外我很喜欢 pi --continue 这个命令,它会直接打开当前仓库或文件夹里的上一段聊天。
另一个我喜欢的点是 steering 系统。当 Pi 正在工作,比如执行 bash 命令、编辑文件之类时,你依然可以输入新消息再按 Enter。这样会排进一个 steering message 队列,等当前工具执行完就会送达。我在发现 Pi 半路走偏、需要快速纠正方向时,经常这么用。有时候我也不用 steering message,而是用 Option+Enter,这样消息会在前一个输出完全生成结束后再发送。
你也可以在 Pi 里使用自己的 OpenAI Codex 订阅,通过 pi-cursor-sdk 使用 Cursor 订阅,或者通过 OpenRouter、xAI、Claude 以及更多 provider 的 API 使用数百个模型。
我喜欢 Pi 的地方
用了 Pi 几周之后,下面这些点最突出。
- 简单又快: 终端界面非常利落。没有 Electron,也没有界面卡顿。
- 可定制: 我做出了自己想要的底栏,装上自己需要的包,其他部分就保持极简。
- 兼容任何 provider: 我经常用 DeepSeek 和 Kimi,切换只差一个快捷键。用它时也能学到很多东西,因为你会更接近这些能力实际是怎么运作的,不像一些更打磨过的工具,很多东西都被藏起来了。
- 会话树非常出色: 可以给对话分支、回到任意节点,这是我用其他工具时很想念的能力。
- 开源 MIT: 我喜欢没有哪家公司来决定我能得到什么功能,也不会决定我要付多少钱。
- 压缩机制就是好用: 我几乎不用去想上下文限制。Pi 会在后台处理,而且比别家更快也更好。
最后的想法
主项目工作里,我依然会继续用 Cursor 和 Codex,短期内看不到会变。这两者都是打磨得很成熟的工具,也都把自己的事情做得很好。
但 Pi 已经在我的边项目和实验项目里拿到了一个长期位置。它快,也便宜,特别是搭配 DeepSeek 和 Kimi 时。而且 Pi 加上几个选得准的包,到目前为止一直都很稳。
我现在的配置大概是这样。
- DeepSeek v4 Pro,思考级别
xhigh,作为默认模型 - DeepSeek v4 Flash 处理更轻的任务
- Kimi K2.6 / K2.7 Code 作为替代模型
- pi-web-access 通过 Exa 做网页搜索和内容提取
- pi-codex-goal 用来跟踪更长周期的任务
- pi-vision-proxy 通过 Kimi K2.6 处理图片
- pi-agent-browser-native 处理终端里的浏览器任务
- pi-cursor-sdk 让我在 Pi 里使用 Cursor 订阅
- 带有写作风格和行为规则的 APPEND_SYSTEM.md
- 一个自定义极简底栏扩展
差不多就是这些。我也试过更多包,但最后只留下了真正会用到的。
如果你本来就习惯在终端里工作,也喜欢这种极简又可扩展的代理思路,可以试试 Pi。先从最基础的能力开始,等真的觉得有需要了再往上加包。
我已经用了 Pi 几周,现在这套配置很稳定。有几个我觉得价值不够的扩展已经卸掉了。配置越简单越好。
随着我继续发现 Pi 的新东西,我也会持续更新这篇文章。