本文会带你一步步了解,如何为你的 agentic 应用封装 codex exec。codex exec "your query"(短别名:codex e "your query")是面向无头/可脚本化场景的专用命令:以非交互方式执行,将进度流式写入 stderr,只把最终的 agent 消息输出到 stdout,然后退出。
背景
如果你用过 Codex 的交互式 TUI,你已经知道这个 agent 能做什么。codex exec 让你把同一个 agent 放进脚本和 CI 流水线里。它会把进度流式写到 stderr,同时只把最终的 agent 消息写到 stdout。默认情况下,它在只读 sandbox 中运行,需要一个 Git 仓库,并通过 CODEX_API_KEY 进行认证。
封装 CLI
核心都归结为 codex exec(或 codex e)。它是一次性调用 CLI:运行 agent,把进度流式写到 stderr,并将最终结果输出到 stdout。本文所有结论都来自于对 Codex CLI v0.114.0 的 66 种 flag 组合进行测试,因此这里描述的行为都已对照真实 CLI 验证过。
状态机
可以把 codex exec 看作一个状态机:它有两个彼此独立的维度,并以正交方式组合:
第一个维度是输出格式,决定 stdout 输出什么。
https://developers.openai.com/codex/noninteractive/
第二个维度是权限等级,决定 agent 被允许做什么。
developer_instructions = "IMPORTANT: Always respond in bullet points. Focus on security."
任意输出格式都可以与任意 sandbox 模式搭配使用。与交互模式不同,这里没有双向流式传输——输入一次性给齐,输出单向流出。
有个小细节:--full-auto 是硬覆盖,会始终把 sandbox 锁定为 workspace-write。如果你传了 --full-auto --sandbox danger-full-access,显式的 --sandbox flag 会被静默忽略。想要 full access,请直接用 --sandbox danger-full-access(或 --yolo)。
注意事项
- codex exec 默认要求 Git 仓库(或受信目录)。用 --skip-git-repo-check 可跳过检查。
- stderr 用于流式输出进度;stdout 只包含最终结果。做管道/重定向时别搞混。
- CODEX_API_KEY 只对 codex exec 生效,对其他命令无效。
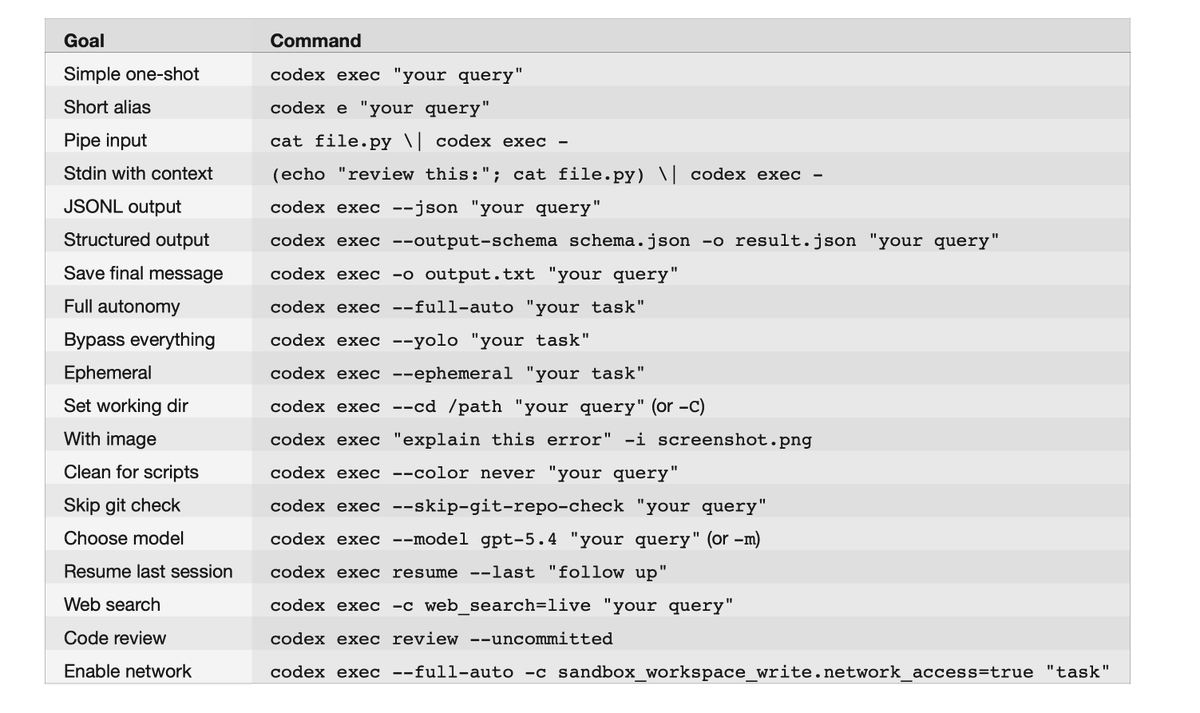
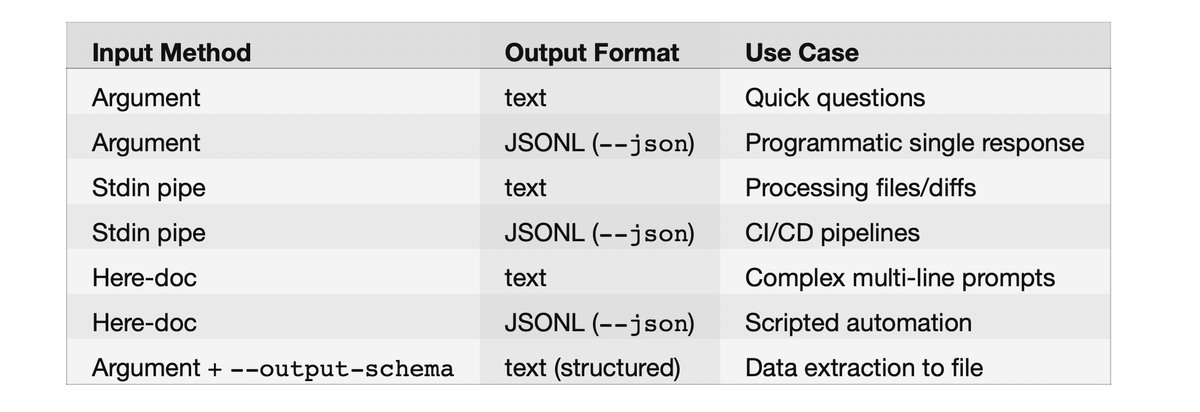
基本用法模式
数据如何输入:输入方式
把 prompt 传给 codex exec 有多种方式:
- Command Line Argument(最常见)
codex exec --json -c model_reasoning_summary=detailed -c hide_agent_reasoning=false "complex task"
- Stdin Pipe(从另一个命令把内容管道过来:)
# To terminal (progress on stderr, result on stdout)
codex exec "summarize the repository structure"

# Capture to variable (only gets stdout = final message)
response=$(codex exec "What is 2+2?")
echo "$response"

# Save to file
codex exec "Write a haiku" > haiku.txt

# Pipe to another command
codex exec "generate release notes for the last 10 commits" | tee release-notes.md
- Stdin Redirect(从文件读取:)
codex exec -c features.shell_tool=false "analyze this code"
# or equivalently:
codex exec --disable shell_tool "analyze this code"
- Here-Doc(多行 Prompt,特别适合带格式的复杂提示)
[mcp_servers.my_server]
enabled = true
command = "npx"
args = ["-y", "my-mcp-server"]
enabled_tools = ["safe_tool_1", "safe_tool_2"]
disabled_tools = ["dangerous_tool"]
required = true
- Image Input(附上截图或设计稿——prompt 必须写在 image flag 之前)
codex exec < prompt.txt
组合输入方式
只有在未提供 prompt 参数(或使用 -)时才会读取 stdin。要把上下文与指令结合起来,就把它们拼接成同一条 stdin 流:
import { execSync } from "child_process";

function chat(prompt: string, model = "gpt-5.4"): string {
  const result = execSync(`codex exec --model ${model} --ephemeral`, {
    input: prompt,
    encoding: "utf-8",
  });
  return result;
}

const response = chat("What is the meaning of life?");
console.log(response);
数据如何输出:输出方式
共有 2 种输出格式,外加一个文件捕获 flag:
1:文本输出(默认,人类可读,纯文本)
const readline = require("readline");

for await (const line of readline.createInterface({ input: process.stdin })) {
  const event = JSON.parse(line);
  if (event.type === "item.completed" && event.item?.text) {
    process.stdout.write(event.item.text);
  }
}
2:JSON Lines 输出(机器可读)
通过 --json(或 --experimental-json)获取 JSONL 事件流:
{"type":"thread.started","thread_id":"019ce6ce-65fd-7530-8e6b-9ccce0436091"}
{"type":"turn.started"}
{"type":"item.completed","item":{"id":"item_0","type":"agent_message","text":"PING"}}
{"type":"turn.completed","usage":{"input_tokens":8497,"cached_input_tokens":8448,"output_tokens":51}}
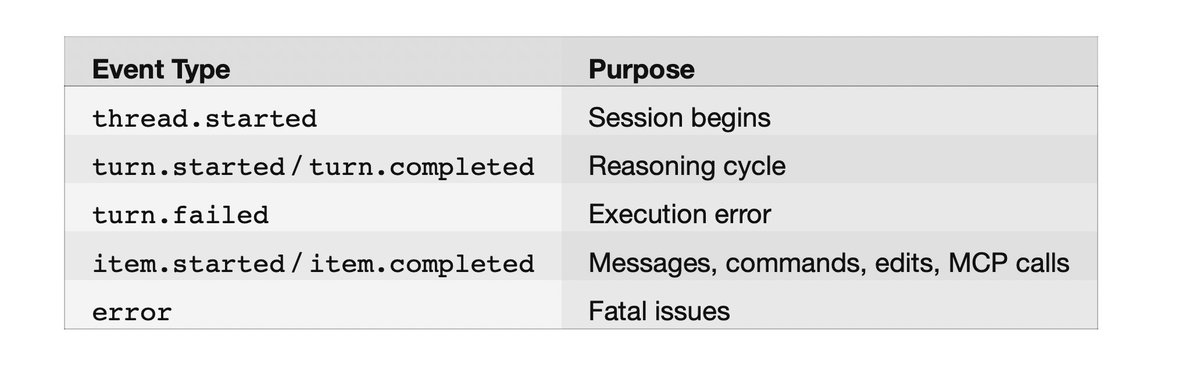
会返回以换行分隔的 JSON 事件,包含这些事件类型:
codex exec --json "summarize the repo structure" | jq
示例事件流:
https://developers.openai.com/codex/cli/features
默认情况下,reasoning items 会从 JSONL 流中隐藏。要把它们包含进来(在使用 model_reasoning_summary 时):
model_instructions_file = "./my-instructions.md"
这会在 agent message 之前新增 item.completed 事件,其 "type": "reasoning"。
用 jq 提取字段:
codex exec -c web_search=live "what is the latest version of React?"
实时解析:
codex exec --full-auto \
  "Read repo, run tests, identify minimal fix, implement only that change, stop."
或在 Node.js 中:
https://developers.openai.com/codex/config-basic/
输入/输出组合矩阵
model = "gpt-5.4"
使用 JSON Schema 的结构化输出
这是做数据抽取时的杀手级功能。通过 --output-schema 指定 JSON Schema 文件,即可让响应结构化输出:
# Get just agent messages
codex exec --json "What is 2+2?" | jq 'select(.type == "item.completed") | .item.text'

# Get token usage from turn completion
codex exec --json "Hello" | jq 'select(.type == "turn.completed") | .usage'
示例 schema 文件(schema.json)。提前提醒:OpenAI API 会强制使用 strict mode,因此每个对象都必须包含 additionalProperties: false,并且 required 必须列出所有属性。我为了搞清这一点折腾了两次,第三次才成功:
https://developers.openai.com/codex/config-reference/
最终消息会遵循该 schema,并写入你通过 -o 指定的文件,同时仍会出现在 stdout。注意:-o 总是捕获纯文本。与 --json 结合时,stdout 输出 JSONL 事件流,而文件里只有最终的 agent 消息。这让 -o 很适合在 stdout 上流式输出 JSONL 以便监控的同时,把结果单独抽取出来。
工具配置
默认情况下,Codex exec 可以使用 shell 工具与文件操作。你可以通过 config.toml 对工具进行非常细粒度的配置:
禁用 Shell Tool(纯 LLM)
--enable 与 --disable 这两个 flag 是 -c features.
也可以在 ~/.codex/config.toml 中设置默认值:
[features]
multi_agent = true

[agents]
max_threads = 6
max_depth = 1

[agents.reviewer]
description = "Code reviewer that focuses on security and performance"
按应用控制工具
在 config.toml 中启用/禁用特定 MCP 应用及其单个工具:
网页搜索
交互模式的 --search flag 不能用于 codex exec。要在 exec 模式启用网页搜索,请使用配置键:
codex exec <<EOF
You are a code reviewer. Review this code:

def add(a, b):
    return a + b

Focus on: error handling, edge cases, documentation.
EOF
取值:disabled | cached | live(默认:cached)。
MCP 服务器配置
权限模式
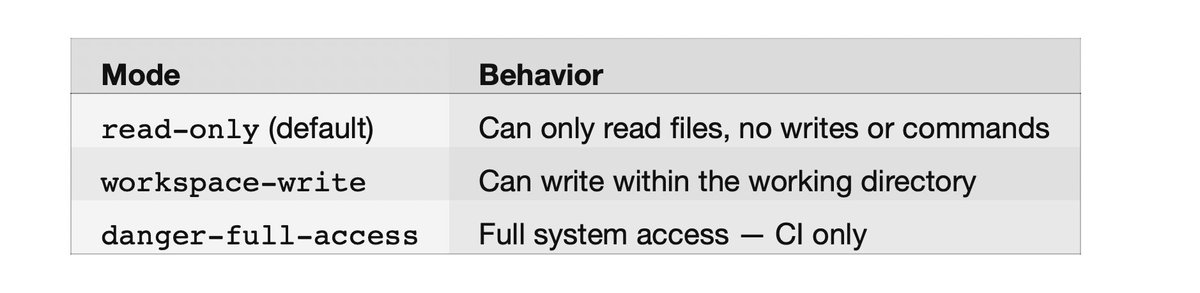
自主执行(autonomous execution)取决于两件事:sandbox policy 与 approval policy。
Sandbox 模式(--sandbox 或 -s):
https://developers.openai.com/codex/auth/
在 exec 模式下,approval 永远是 never,因为没有交互式用户可供提示。--full-auto 的文档把它描述为 on-request,但在 exec 模式里会自动收敛为 never。
便捷 flags:
[apps._default]
enabled = false

[apps.my_tool]
enabled = true

[apps.my_tool.tools.dangerous_action]
enabled = false
用于 CI/CD 流水线
https://developers.openai.com/codex/cli/reference
额外可写目录:
# Review uncommitted changes
codex exec review --uncommitted

# Review changes against a branch
codex exec review --base main

# Review a specific commit
codex exec review --commit abc123
Sandbox 细调
https://developers.openai.com/codex/models/
会话管理
临时会话(不落盘)
--ephemeral 会阻止将会话 rollout 文件保存到磁盘:
# Single image
codex exec "Explain this error" -i screenshot.png

# Multiple images
codex exec "Summarize these diagrams" --image img1.png,img2.jpg
恢复之前的会话
用新的指令继续之前的会话:
# Recommended flagship model
codex exec --model gpt-5.4 "complex task"

# Industry-leading coding model
codex exec --model gpt-5.3-codex "standard task"

# Text-only near-instant research preview (ChatGPT Pro only)
codex exec --model gpt-5.3-codex-spark "quick question"
继续最近一次
代码审查
codex exec review 是专门用于自动化代码审查的子命令。它需要一个 git 仓库,并且满足以下之一:
#!/bin/bash
# agentic-codex.sh - Production wrapper for autonomous execution

TASK="$1"

codex exec \
  --model gpt-5.4 \
  --full-auto \
  --ephemeral \
  --json \
  --output-schema ./task-schema.json \
  -o ./result.json \
  "$TASK"

# Extract structured output
success=$(jq -r '.success' ./result.json)
summary=$(jq -r '.summary' ./result.json)

echo "Task: $success"
echo "Summary: $summary"
它会生成结构化的审查评论,包含严重级别(P1-P4)、文件路径与行范围。我真没想到它会这么好用;它甚至抓到了我不小心留在某个文件里的测试标题残留。
自定义系统提示词
完全替换
在 config.toml 中使用 model_instructions_file,可替换内置指令(而不是使用 AGENTS.md):
codex exec "Extract project metadata" \
  --output-schema ./schema.json \
  -o ./project-metadata.json
追加到默认提示(推荐)
在 config.toml 中使用 developer_instructions,可以在不替换默认内容的前提下,注入额外指令:
# Workspace-write sandbox + auto-approval (recommended for local automation)
codex exec --full-auto "your task here"

# Bypass everything — only use in isolated CI runners
codex exec --dangerously-bypass-approvals-and-sandbox "your task here"

# or equivalently:
codex exec --yolo "your task here"
或者在项目根目录放一个 AGENTS.md —— Codex 会自动读取它作为额外上下文。
自定义 Agent
通过 config.toml 配置多 agent 协作:
codex exec --json "Write a story" | \
  while IFS= read -r line; do
    text=$(echo "$line" | jq -r 'select(.type == "item.completed") | .item.text // empty' 2>/dev/null)
    [ -n "$text" ] && printf "%s" "$text"
  done
模型选择
基本模型选择
https://developers.openai.com/codex/concepts/sandboxing/
或在 ~/.codex/config.toml 中设置默认值:
codex exec resume --last "follow up question"
推理控制
无双向流式传输
codex exec 不支持双向流式传输。它是一次性命令:输入需要提前提供(通过参数、stdin 或 here-doc),输出则单向流出。若要实时交互的使用场景,请改用交互式 TUI 模式(codex)。
串起来:整合示例
生产级 Agentic 封装器
聊天机器人封装器
[features]
shell_tool = false
数据抽取流水线
codex exec --full-auto --add-dir /tmp/output "generate reports"
速查
codex exec "explain this function in main.py"
# or short alias:
codex e "explain this function in main.py"
注意事项
I/O
codex exec 默认要求 Git 仓库(或受信目录);可用 --skip-git-repo-check 跳过。进度会流式写到 stderr,只有最终消息会写到 stdout。只有在未提供 prompt 参数(或使用 -)时才会读取 stdin,因此你无法同时提供 prompt 参数并再从 stdin 管道输入内容。图片 flag(-i / --image)必须放在 prompt 参数之后。没有双向流式传输;需要实时聊天请使用交互式 TUI。
结构化输出
--output-schema 接受文件路径,因此先把 schema 写到文件里。schema 必须使用 strict mode:additionalProperties: false,且所有属性都要写进 required。
权限与安全
--yolo 会绕过全部安全限制;只应在不含敏感访问的隔离 CI runner 中使用。required 的 MCP 服务器(required = true)如果初始化失败,会导致退出并报错。--search 不能用于 codex exec(会返回 “unexpected argument”);请改用 -c web_search=live。
认证与环境
CODEX_API_KEY 会覆盖已存储的认证信息,且只对 codex exec 生效。若 ~/.codex/auth.json 中已有有效凭据,OPENAI_API_KEY 会被静默忽略,因此 exec 模式要覆盖认证请用 CODEX_API_KEY。OPENAI_BASE_URL 用于重定向 API 调用(适用于代理与自定义 endpoint)。CODEX_HOME 用于把全部配置、认证与会话存储从 ~/.codex 重定向到其他位置。
会话
恢复一个临时会话(ephemeral session)时,会静默创建新会话而不是报错,因为原会话从未被持久化。
二维状态机(输出格式 × sandbox 等级)让整体足够简单,而 -c 的配置覆盖又能让你无需触碰 config.toml 就能调整其余一切。如果你要在 Codex 之上构建 agentic 应用,从 --full-auto --json 开始;当你需要结构化数据时再叠加 --output-schema。这样就能覆盖 90% 的使用场景。